Overview
jspsychr provides a simple way to make jspsych experiments using R-studio. See last section for a brief history on the development of this package and it’s relationship to other similar packages like xprmntr, and jaysire.
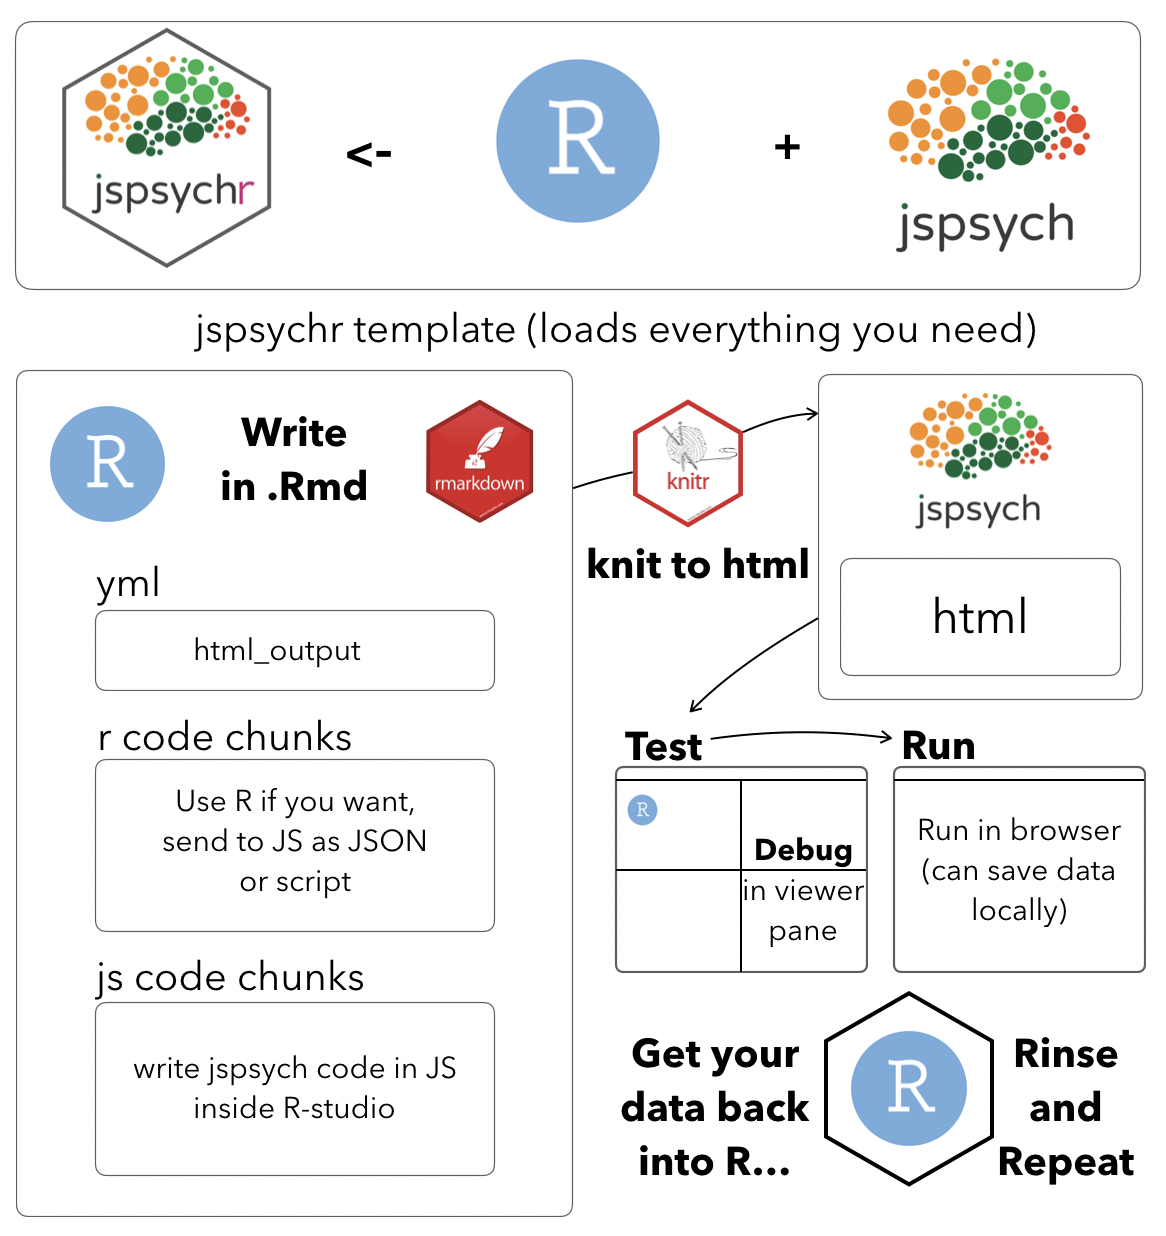
What’s in jspsychr?
- An R markdown template for building jspsych experiments. After you install jspsychr, the template should be available when you create a new R markdown document inside R studio
- Some helper functions that:
- allow running the jspsych experiment locally using plumber (thanks to Danielle Navarro, this functionality is modified slightly from her packages)
- allow you to build dataframes in R for controlling jspsych, and pass them to the jspsych experiment
The big idea
jspsychr uses the built-in ability of knitr and R-studio to compile html documents from an .Rmd file. Experiments in jspsych are typically written as an html file that includes calls to jspsych libraries, and javascript to run the jspsych experiment. The approach here is to put all of this stuff inside an .Rmd document, and then compile it to an html document that runs the experiment. This allows you to write, run, test, and debug a jspsych experiment all inside R-studio. So, if you prefer working inside R-studio (for text editing jspsych experiments), this approach might be for you.
installing jspsychr
Install devtools first if you need to, then run:
# install.packages("devtools")
devtools::install_github("CrumpLab/jspsychr")
jspsychr template
Once installed, you will want to restart R-studio. Then, you should be able to load up a new jspsychr R markdown template. NOTE: jspyschr will assume you are working in an R project, so before making a new jspsychr template, it would be a good idea to create yourself a new R-studio project and work within that. Once you’ve got your blank R-studio project, choose new R markdown, then from template, then find jspsychr, give it a name and load it up. In this example I’ve given my template the name Experiment_1.
When the template loads, you should find a new folder with the name you gave it. The folder has the following structure:
-- Experiment_1
   |__data # folder for data files
   |__Experiment_1.Rmd # a description file for your experiment
   |__experiment # folder for experiment scripts
      |__index.html # the jspsych experiment
      |__index.Rmd # generates the above experiment
      |__jspsych-6-2 # jspsych javascript library
      |__jspsychr # jspsychr javascript library
   |__run.R # a file to run the experiment locally with plumber
-- testjspsych.Rproj # your R project file
index.Rmd
The index.Rmd file is where all the magic happens. You code your jspsych experiment here, then knit it to produce the html (index.html) that you need to run the experiment in a browser. The example loaded by the template shows a simple Stroop experiment, and uses some jspsychr functions to build the stimulus set for the experiment.
After knitting index.html, you should be able to run the experiment in your browser by loading the index.html file in your browser. Alternatively, you can run the code inside the run.R file, which will turn R-studio into a server (using plumber), and load the index.html into a browser for you.
Major components of index.Rmd
There are three major components to the index.Rmd file: the yml, R code chunks, and js code chunks.
yml
The yml is at the top, and you mostly don’t need to modify it. You can give your experiment a name, and give yourself a name. Otherwise, this yml makes a mostly empty html file, and loads the css style from the jspsych library.
---
title: "Experiment Name"
author: "Your Name"
output:
  html_document:
    mathjax: null
    highlight: null
    theme: null
    css: jspsych-6-2/css/jspsych.css
---
R code chunk to load jspsych plugins
We use an r code chunk to write the jspsych library and plugins, as well as the jspsychr.js file to the html generated by index.Rmd. The example below is from the example generated by the jspsychr template. If you are using different jspsych plugins, you will need to load them in here. Note, the writing of a script to html is done by the htmltools package.
```{r}
# load jspsych and plugin scripts
# note: this is an r code chunk
library(htmltools)
tagList(
tags$script(src='jspsych-6-2/jspsych.js'),
tags$script(src='jspsych-6-2/plugins/jspsych-html-keyboard-response.js'),
tags$script(src='jspsychr/jspsychr.js')
)
```
R code chunk to create stimuli
This next step uses R to create stimuli, rather than using javascript to create stimuli. The example experiment is a Stroop experiment with word and color pairs generated from combinations of red, green, blue, and yellow. jspsych needs a javascript object with definitions for the stimulus to be displayed on each trial. Rather than writing that in javascript, jspsychr allows you to write in R, and then output as a javascript object. In this example, I create a data frame coding various properties of the stimuli I am creating, and then this dataframe is converted to a json object, and stored as javascript variable (i.e., that is written to index.html during knitting).
Note that the following code is placed within a knitr r code chunk with results=“asis”
# Define stimuli in R, output as script
# note: this is an r code chunk, with results = "asis"
library(jspsychr)
library(dplyr)

# create dataframe to define stimuli
stroop_stim <- data.frame( stimulus = length(16),
                           word = rep(c("red","green","blue","yellow"), each=4),
                           color = rep(c("red","green","blue","yellow"), 4),
                           response = rep(c("r","g","b","y"), 4),
                           stim_type = length(16),
                           id = "stroop_stim",
                           fontsize = "60pt") %>%
  mutate(stim_type = as.numeric(word==color)) %>%
  mutate(stim_type = recode(stim_type, `1` = "congruent", `0` = "incongruent"))

# write html definitions to the stimulus column
# note this could be added as a pipe to the above
stroop_stim$stimulus <- html_stimulus(df = stroop_stim,
                                html_content = "word",
                                html_element = "p",
                                column_names = c("color","fontsize"),
                                css = c("color", "font-size"),
                                id = "id")

# create json object from dataframe
stimulus_json <- stimulus_df_to_json(df = stroop_stim,
                                     stimulus = "stimulus",
                                     data = c("word","color","response","stim_type"))

# write json object to script
write_to_script(stimulus_json,"test_stimuli")
js code chunk for jspsych
The rest of the work is all written in javascript, by using a js code chunk rather than an R code chunk.
/* Note this is a js (javascript) code chunk

/* experiment parameters */
var reps_per_trial_type = 1;

/*set up welcome block*/
var welcome = {
  type: "html-keyboard-response",
  stimulus: "Welcome to the experiment. Press any key to begin."
};

/*set up instructions block*/
var instructions = {
  type: "html-keyboard-response",
  stimulus: "<p>In this task, you will see word in a color</p>"+
    "<p style='color:red;font-size:60pt;'>BLUE</p>"+
    "<p>Press r, g, b, or y to identify the color, not the word</p>"+
    "<p>E.g., press r for red in this example</p>"+
    "<p>Press any key to begin.</p>",
  post_trial_gap: 1000
};

/* defining test timeline */
var test = {
  timeline: [{
    type: 'html-keyboard-response',
    choices: ["r","g","b","y"],
    trial_duration: 2000,
    response_ends_trial: true,
    stimulus: jsPsych.timelineVariable('stimulus'),
    data: jsPsych.timelineVariable('data'),
    on_finish: function(data){
      var correct = false;
      if(data.response == 'r' &&  data.key_press == 82 && data.rt > -1){
        correct = true;
      } else if(data.response == 'g' &&  data.key_press == 71 && data.rt > -1){
        correct = true;
      } else if(data.response == 'b' &&  data.key_press == 66 && data.rt > -1){
        correct = true;
      } else if(data.response == 'y' &&  data.key_press == 89 && data.rt > -1){
        correct = true;
      }
      data.correct = correct;
    },
    post_trial_gap: function() {
        return Math.floor(Math.random() * 1500) + 500;
    }
  }],
  timeline_variables: test_stimuli,
  sample: {type: 'fixed-repetitions', size: reps_per_trial_type}
};

/*defining debriefing block*/
var debrief = {
  type: "html-keyboard-response",
  stimulus: function() {
    var congruent_rt = Math.round(jsPsych.data.get().filter({correct: true, stim_type: 'congruent'}).select('rt').mean());
    var incongruent_rt = Math.round(jsPsych.data.get().filter({correct: true, stim_type: 'incongruent'}).select('rt').mean());
    return "<p>Your average response time for congruent trials was <strong>" + congruent_rt + "ms</strong>.</p>"+
    "<p>Your average response time for incongruent trials was <strong>" + incongruent_rt + "ms</strong>.</p>"+
    "<p>Press any key to complete the experiment. Thank you!</p>";
  }
};

/*set up experiment structure*/
var timeline = [];
timeline.push(welcome);
timeline.push(instructions);
timeline.push(test);
timeline.push(debrief);

/*start experiment*/
jsPsych.init({
    timeline: timeline,
    on_finish: function() {
        jsPsych.data.displayData();
    }
});
jspsychr development history
In summer 2019 I got interested in trying jspsych out for programming browser-bsaed experiments. At the same time, Danielle Navarro was developing xprmntr, an R package for jspsych, and I forked a copy to check it out. Danielle has since totally overhauled xprmntr, and is working on jaysire, which also provides functionality for using R to build jspsych experiments. So what’s different?
As I understand the updated xprmntr, and jaysire, both are aimed at providing R wrapper functions to jspsych. I think the idea is to write the whole jspsych experiment in R, avoiding javascript altogether!
The aim of jspsychr is different in that it mixes R and javascript. Use R to do things like create your stimulus set, and use javascript to set up jspsych plugins. Check out the other packages if they suite your needs, and learn more about jspsych experiments by reading the jspsych documentation https://www.jspsych.org
more jspsychr examples
I’ve set up another git repository with some examples of using jspsychr, you can see them here: https://github.com/CrumpLab/jspsychrexamples